Kitbashing a "classic" factory
Building a five story factory building for a friend/Lou Moschetti
Railroad Model Craftsman: August 2007
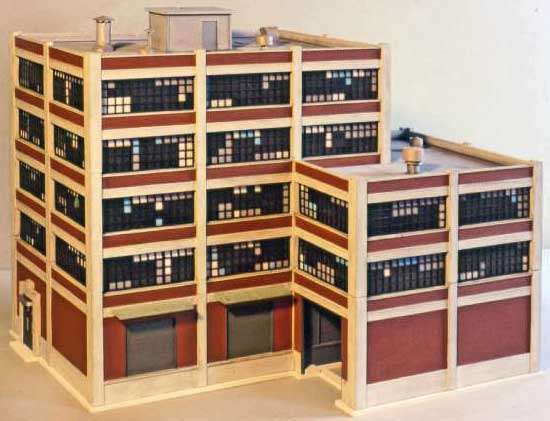
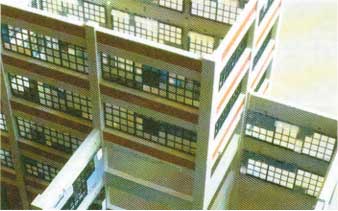
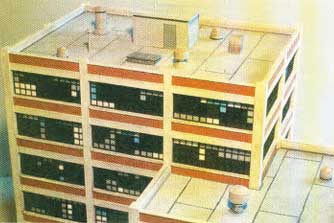
A few years ago, I agreed to build a number of structures for a friend's layout in exchange for some favors he did for me. It has taken longer than expected to live up to my end of the deal, but I am slowly getting the industrial section of his layout filled with buildings. This is the fifth building that I've completed so far in my efforts to pay off my overdue debt.
All the structures I've built for my friend have been from plastic kits just like this one. However, because the last structure I build was heavily kitbashed, this time I wanted one that would be relatively simple in comparison, yet still yield an interesting building. That led me use use a City Classics' Smallman St. Warehouse since the basic kit is fairly simple and its sectional design makes it easy to modify. The kit comes as a three story building, but I wanted a larger structure. That meant using the No. 104 Two Story Add-On kit and additional wall pieces to add a three story annex to the main building.
Assembling the main building goes pretty fast since it's really just a large box. The most important thing is to use care when adding the upper two story sections and making sure the pilasters are aligned and the joints are fairly smooth. I've noticed that actual structures of this type, with poured concrete columns and beams, do have construction joints in the concrete because they can only pour so much at one time, so being able to see a small line where the plastic sections are joined together is not totally unrealistic. Just make sure the pilaster sections are butted together as tightly as possible. Big gaps in the pilaster aren't prototypical.
I made the three-story annex out of additional smaller end wall sections of the kit, which are available separately. This required a bit more work since the end walls feature only one half of the end pilaster width. To get the proper width, I added corner pieces made of .080" square strips of Evergreen styrene. In addition to adding the corner pieces, I cut off the end pilasters where the walls would butt up against the main building columns. There was also a small bit of filing and fitting to get both walls of the annex to line up with the main building columns.
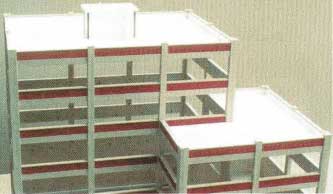 |
| When the framework for the building was put together (above), the end pilaster were cut off where they butted together and corner pieces were attached. A rim made of styrene strip (below) was placed around the edge of the roof pieces. This helped with the painting. |
 |
After I assembled all the walls, I cut .040" thick whit styrene sheet plastic to size for the roofs. The annex roof was a bit tricky because it wraps around the corner column where the pilaster projects out past the concrete beams. It ended up being a very tight fitting piece that had to be twisted into position once the model as finished.
I can't recall why, but at the time, I decided to build a rim of styrene strip around the edge of each roof piece. It may have been because it allowed me to spray the whole unit dark gray and then drop it into place without brush painting the inside of the walls to match. Whatever the reason, it turned out well since the edge strips kept the roof more rigid than a plain piece of styrene and made it easier to install the roof as a separate unit even though it may not look prototypically correct upon close insepection. I then set the roof aside until it was time to paint and add the detail parts.
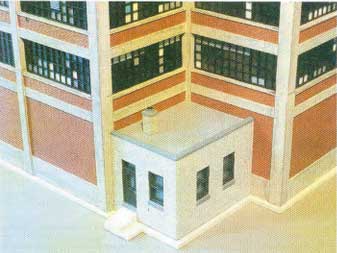
I wasn't certain how much of the rear of the building would be visible in its final placement, but I wanted to add at least something to make it more visually interesting. That ended up being a small corner addition using leftover walls from my scrap box. The two walls were from a City Classics' Carnegie St. Manufacturing Kit; however, almost anything would have worked as well.
Once I had the walls glued together and filed to fit tightly against the main walls, I cut a sheet stryene roof to fit and glued small strips of styrene inside the walls for support. When butting wall sections against the main walls, file the edge to fit the profile of that wall where the foundation projects slightly beyond the brickwork. The small corner addition can then set aside until painting.
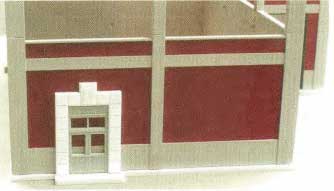
The basic kit doesn't come with anything other that a small industrial door for people to enter the building, but I wanted something more along the lines of a mill entrance for customer and vendors. Using a set of double doors from my scrapbox, I made a frame using Evergreen strips and a piece of scribe styrene sheet to represent a poured concrete doorway. I laminated a few small scrap pieces to form a keystone over the door and made a small art-deco type canopy by wrapping a thin piece of corrugated styrene around the edges of a piece of styrene strip. I didn't bother to cut out behind the doors, as will be explained later.
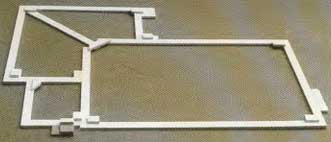
After all of the wall construction was finished, I made a base/foundation for the structure using hefty .100" thick strips of Evergreen Scale Models styrene. I like to make these for all of my structure that are to be set into the scenery. The building sits on this.
Having a base like this allows it to be cemented to the layout and the scenery material (plaster, dirt, foam, etc.) worked right up to the edge, making it part of the layout. That way, you don't have to worry about smearing the plaster or ground cover on your newly finished structure. It also eliminate unsightly gaps between the building and the scenery base that seem to ruin many good layout photos. In constructing the base, add small blocks of scrap styrene in the corners to help locate the finished building.
With patience, make a square, level base that fits the building; you will have to look very closely at the finished layout to see that the actual building is removable and not part of the scenery base. You can see in the photos that this base also has the steps and small pad which line up with the entrance door. The diagonal peice strengthens the base and keeps it square until it's cemented in place on the layout.
The next step, painting, was dreaded by me. Since large structures like this don't require the extra finsihed needed on rolling stock (and because I have a history of airbrush disasters), I usually opt for spray cans when painting plastic structure. I'm sure there are a number of different ways to paint a brick curtain-wall structure where both the concrete and brick protions are molded in place. I wasn't feeling very advernturous, however, so I chose the easiest method. I sprayed the whole structure gray and then brush painted the brick sections.
The next time I build a model of this type, though, I will try spraying the brick panels first and then masking them while I spray the concrete portions of the structure. Since almost all of the brick section are the same size, it seems as though I should be able to make a plastic template that can be used to cut every piece of tape to the correct size. Only in a few areas, like around doors, will a few extra pieces of tope need to be cut to cover the wall section.
At any rate, I sprayed the whole building and base with Testors Flat Light Aircraft Grey. Even though it's not my favorite color to represented the brownish-gray shade of aged concrete, I weighed that against it's availability in case of damage during shipping to my friend. I realize that I could purchase an "aged concrete" color paint, but for some reason, those colors didn't seem right to me either. I have yet to find a bottle paint that looks right for old concrete. At the same time, I sprayed the small rear addition a slightly different shade of gray. I don't recall what exact shade of gray it was.
After the gray dried a long time, mainly because I put off the brush painting for as long as humanly possible, I brush-painted the brick sections using Polly Scale's Zinc Chromate Primer. This painting seemed to take forever since most areas required two coats to achieve and even, opague finish.
When faced with a lot of repetitious painting, as on this building, I try to paint only a few sections at a time. I find it doesn't seem as overwhelming as rushing and ending up making mistakes. Instead, I work on six or seven sections at one sitting. This means I can spend more time on each section and cut down the amount of retouching later.
 |
| Thick styrene pieces were used to form the foundation for the building. With the thick base, it is easier to add scenery around the bilding with ballast, soil or foam material. |
Once the brick panels were painted, I finished the brush painting by doing the doors and small addition windows with Polly Scale I.J.N. Green, which I think is from their military paint line. Then I painted the inside walls near the rail door black so it wouldn't be as obvious that I left part of the original wall in place. Details and clutter can be added later to disguise that portion of the wall.
When building structures, I try to keep a variety of different shades of gray spray paint on hand. I used one of the medium grays for the roofs. I made a small elevator house for this roof using some scrap pieces of plastic brick I had lying around and sprayed it the same shade of gray, since it seems like so many items on roofs all end up looking the same shade of sooty gray after a number of years.
I wasn't excited about the roof details on this model. Maybe because the painting took so long I wanted to get the project done during my lifetime and didn't want to hold it up any longer trying to add unique roof details.
Instead, I used a mix of vents from Walthers detail set and some vents that came with the kit, plus a few parts from my scrapbox. The are typical of things you'd see on an industrial rooftop.
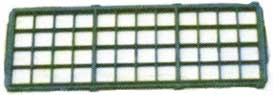
Once the brick panels were painted, I started on the other time-consuming part of the project, the windows. When you have this many window in a model, it takes a long time just to cut all the parts from the sprues! After the windows were cut from the sprues, I added clear plastic to them. Since there wasn't a lot of surface to glue the clear material to the back of the window frames, I used a somewhat different method.
I cut the clear material oversize, laid the window molding over it an put dabs of Weldbond® glue around the edges of the frame. Doing it that way virtually insured not having to worry about glue gushing out into the window areas, as is likely when you apply glue to the back of the moldings. I should also mention that the window moldings that were to be used on the three-story annex required some extra work. The windows where the annex abutts the main building needed to have the gluing flanges trimmed off to fit the opening.
After all of the clear plastic was in place, I started another tedious task, painting the wondow panes a mix of blue, white and gray to simulate window that had been replaced over the years. I'm sure I could have used a wider variety of colors, but I wanted to get this model done. Using those three colors, I randomly painted a number of panes on each window, while on some I only used two of the colors. Thankfully, the window mullions helped to hide any crooked edges. They were pretty think moldings, but they helped hide a less than perfect paint job.
 |
| To glaze the windows quickly clear material was placed on a flat surface and the window frames were laid on it. The glue was dabbed around the edges so there was less mess. |
  |
| In the area where the annex butts against the main building (middle) the glue flanges for the windows were trimmed off. The window panes were painted blue, white and gray to indicate windows that had been broken and replaced over the years. This was done randomly, and mullions helped hide any mistakes. |
Since this style of building doesn't typically have a lot of exterior details, I thought some type of roof or canopy over the truck doors would add interest to the finished model. I had some corrugated canopies left over from the same City Classics kit as the small rear addition, so I used them.
To make sure they stayed in place during shipping I drilled small holes in the back and cemented short pieces of brass wire in them. I drilled holes to match in the concrete beams then cemented the canopies in place. A little dab of glue on the inside where the wire projected insured that they couldn't be easily broken off.
The last items to be finished were the roof sections, which were already painted a shade of medium gray. Using a permanent blake marker, I drew on lines to simulate the tar joints between stips of roofing and around the edges. After that was done, I added the roof details. Some of the smaller ones were glued on, but those that could be broken off were attached after I drilled holes and used screws. Most of these details had been painted silver weeks before at the same time the building was being painted. At the same time, I cemented the finished rear addition in place.
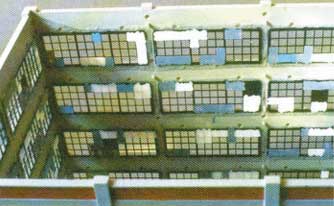
Before the roofs were installed, I took a large sheet of black poster board and made view blocks to fit inside the building. I know some modelers prefer to place a piece of cardstock diagonally from one corner to the other, but that doesn't seem substantial enough for a structure that is about 80 percent windows. Instead, I used two pieces of poster board and made a big "X" shapped core that fitted into each of the corners. I used a variety of smaller pieces in the annex to prevent viewers from looking down into the area where the track enters the building.
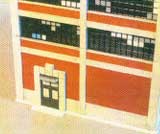 |  |
| The main entrance (above) was finished with the clear plastic in the door windows being painted gray. This disguided the fact that the wall behind the door was cut out. The details were added to the roof (right) and chalks were used to detail the roof for correct texture. Finally, Testors Dullcote was sprayed to fix the chalks. |
There was one negative effect from using the ink wash, and it would have happened regardless of how it was applied. It caused the roof tar line to run since I used a marker to make them rather than my usual method of using black paint. Almost as soon as I appllied the wash, I had a runny purple colored mess on my hands, since permanent black markers tend to have a purple cast to them. At first I was really worried that I had ruined the roofs and would have to repaint and re-line them. Just as with the walls, however, I was able to blot up most of the runny mess, which left me with a much lighter purple lines on the roof instead of the original black ones.
 |
| The finished rear addition was attached to the main building. The main details of the structure were painted silver weeks earlier, so they were ready to be installed. |
At this point, I would have normally used chalk to apply some streaks and rust marks around the door and windows, but I was afraid of doing any more damage. I left well enough alone. The next to last step was to spray the whole building with Dullcote to give the windows a frosted appearance resembling dirty unwashed windows.
I was done; I left making the signs and the like for my friend.